Vercel API without Next.js
Create an API endpoint on Vercel with Typescript.
One of the most popular features of Next.js is the ability to create API routes for front end applications. They provide a nice and easy way to provide backend support. Sometimes it may be a good idea to split out the API and UI into separate projects. Using the Vercel npm package makes this possible and very easy to do.
Setting up the project
First create an empty folder with a new package.json and install the vercel package.
mkdir vercel-api-testcd vercel-api-testnpm init -ynpm i vercel
Then let’s add a dev script to start up our local server with vercel.
// package.json
...
"scripts": {
  "start": "vercel dev"
},
...
Now run the script to set up and run the server:
npm start
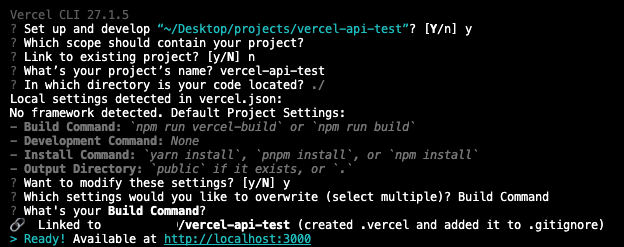
- Vercel will ask you to Set up and develop. Type
Yto continue. (Note: you must be signed in to your vercel account) - Select the team or individual that you want to proceed with. (This may not ask you if you only have a single individual account)
- Link to existing project? Enter
Nto create a Vercel new project and give it a name (Or press enter to use the existing project name). - In which directory is your code located? Leave it as
./ - It will set up your project and ask you to confirm default settings. We will
want to remove the build step since we won’t need it for this example. Type
y - Select Build Command as a setting you want to overwrite. Then press enter so that there is no Build Command.
- You will now have your API running on
localhost:3000
Creating Routes
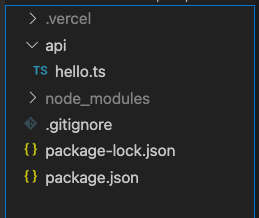
By default Vercel will look for a /api folder so let’s create that with a new
api route called hello.ts. Same as Next.js each file in the api folder will be
a new api route endpoint. Keep in mind these are serverless functions that are
spun up/down as they are needed.
Note: Underscore prefixed files in the api directory, e.g.
_test.tswill not create a new route.
In hello.ts we can use the same example provided by Next.js but adapted for
the vercel library.
import { VercelRequest, VercelResponse } from "@vercel/node";
type Data = {
name: string;
};
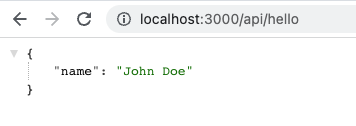
export default function handler(req: VercelRequest, res: VercelResponse) {
res.status(200).json({ name: "John Doe" } as Data);
}
Note: Vercel will handle Typescript files natively as well as Go, Python and Ruby and create serverless functions. Pretty nifty!
Now if we visit http://localhost:3000/api/hello we will see our response.
Accessing Query Params
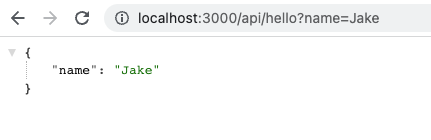
Query params can be accessed from the req.query object. For example, we can
change our code to take in a name as a query param.
import { VercelRequest, VercelResponse } from "@vercel/node";

type Data = {
  name: string;
};

export default function handler(req: VercelRequest, res: VercelResponse) {
  res.status(200).json({ name: req.query.name || "" } as Data);
}
Now if we visit http://localhost:3000/api/hello?name=Jake we will see the
correct response.
Accessing Route Params
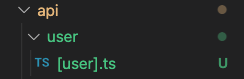
Route params work similar to Next.js. Create a folder for the route and then a file with the param wrapped in square brackets.
Then it's as easy as accessing the query param on the req.query object.
import { VercelRequest, VercelResponse } from "@vercel/node";
type Data = {
user: string;
};
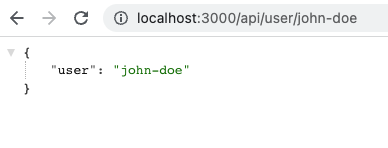
export default function handler(req: VercelRequest, res: VercelResponse) {
res.status(200).json({ user: req.query.user } as Data);
}
Visiting http://localhost:3000/api/user/john-doe will give us the correct
response.
Environment Variables
Environment variables work the same in all Vercel apps.
Simply create a .env file and the variables can be accessed in the API routes
with process.env.SECRET, for example.
CORS
To control CORS in this API create a vercel.json file at the root of the
project and add this config:
{
  "headers": [
    {
      "source": "/api/(.*)",
      "headers": [
        { "key": "Access-Control-Allow-Credentials", "value": "true" },
        { "key": "Access-Control-Allow-Origin", "value": "*" },
        { "key": "Access-Control-Allow-Methods", "value": "GET,OPTIONS,PATCH,DELETE,POST,PUT" },
        {
          "key": "Access-Control-Allow-Headers",
          "value": "X-CSRF-Token, X-Requested-With, Accept, Accept-Version, Content-Length, Content-MD5, Content-Type, Date, X-Api-Version"
        }
      ]
    }
  ]
}
This config will allow any and all access. Adjust as needed to your application.
Deployment
I will not go in depth on deployments but it’s just a matter of connecting your Git repo to Vercel!
Let me know if you found this article helpful!
Have some feedback on this post? .